Properly setting up your router table is crucial. These are some tips to help you set up your router table properly. To avoid overheating, you can also refer to this article. Additionally, we will discuss how router spacers can be made. And finally, you'll learn about hot gluing and how it can help you remove workpieces without damaging them.
How to set-up a router table
To use a routertable, it is important to set the fence at the proper distance from the table. A lift plate is used on most router tables to allow for easier bit height adjustments. The lift plate should be flush with the table surface. To ensure the alignment, you can use a straight edge. To adjust the lift height you might have to remove it from the table or adjust its distance.

How to adjust the cutting length
When using your router, you may have wondered how to adjust the cutting distance. This basically involves changing the cutting distance by moving the router base adjustment to adjust the depth of your blade. Depending on what material you have to work with, you might only need one pass to create decorative edges. You may also need several passes to cut thicker material. The depth of the cut depends on the sharpness of the router bit, the power of the router, and your own personal comfort. If you are unsure of what setting to choose, it is recommended that you start by making a small test piece.
How to prevent router bits from overheating
Modern routers are equipped with variable speed motors. Larger bits will have a faster rim speed than smaller ones. A large panel raising bit can heat up quickly when it is run at high RPMs. For smooth cutting, a straight piece with a 1/4 inch diameter will require higher RPMs. To prevent overheating, set the feed rate to the appropriate speed for the type of wood you're working with.
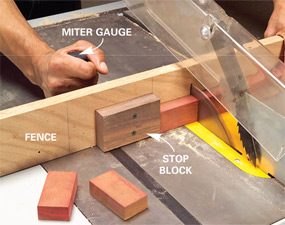
How to make router spacesrs
One reader had a question about how to make router spacers. Mike Pekovich recommends using spacers at your router table to prevent climb cuts. Climb cuts are caused by incorrectly feeding work left to right. A spacer can be added after a router pass to move the spinning bit under the fence. This will prevent dangerous climb cuts. Spacers can either be made of 1/8" and 3/16" plywood.
How to fix a router at a shelf edge so that you can flush-trim solid wood edges
The edge banding on shelves and cabinets should not be removed when you are edging them. The trimmer can be used in the direction of the grain. However, cutting in any other direction will cause the edge to fall. If you'd prefer a smoother edge, try using a flush-trim router bit. A flush-trim router bit works well for this purpose, and you need a panel to stand it on an edge.
How to make your router pattern
Before you can make a router pattern you must first determine the offset of your cutter bit. The offset refers to the distance between the cutting edge of your router bit and the guide bushing. To determine the offset, subtract the bit diameter from the guide bushing and divide the result by two. This chart provides the offset for both common guide-bit- and router-bit-diameter combinations. Some offsets may not work if your router bit is too big.
FAQ
What material would your recommendation be to learn woodworking?
Start off with softwood like pine and poplar. These two are the easiest to master, then you can transition to hardwood.
How much will it cost to get started?
There are no exact numbers because every project is different. These are the factors that will give you an idea of how much you'll need.
-
Cost of materials
-
Tools and equipment
-
Time spent on the project
-
Hourly rate
-
What profit are you expecting to earn?
-
Hire help
Start small, if possible. You can make simple boxes or picture frames if you're just getting started. As you gain experience, you'll be able to tackle more complex projects.
Where can I buy hardwood lumber?
Home Depot offers hardwood lumber. They sell all kinds of wood products, including flooring, cabinets, furniture, etc.
A large variety of engineered hardwoods is available to them, including Ipe (Araucaria Angustifolia), Brazilian Cherry and Peau d'Arco.
You can search Google for hardwood lumber to find them online.
What kind of tools are used to carpenters?
Carpenters use a hammer as their most common tool. A hammer is used for pounding nails into wood. It is also used to help hold pieces together while working on a job. Other tools include clamps. pliers. screwdrivers. measuring tape. pencils. saws. drills. wrenches.
How do you calculate woodworking costs?
It is crucial to keep project costs as low-cost as possible. You should always try to make sure that you are getting the best deal on materials. It is also important to consider the costs of other factors, such time, skill, and experience. Check out our guide on the average cost of common DIY projects to get an idea of how much you can spend on woodwork projects.
What's the time taken to finish a piece furniture?
It depends on what size piece of furniture you have. Smaller projects like boxes and picture frames can be finished within one day. Larger projects such as tables and desks can take several days to complete. It takes time for the wood to be stained and sealed properly.
What tools work best for me?
It's important that you consider your needs and preferences while shopping for tools. What do you prefer: metal or plastic handles? What size screws and nails do you use most often? Would you rather use hand tools than power tools?
Statistics
- The best-paid 10 percent make $76,000, while the lowest-paid 10 percent make $34,000. (zippia.com)
- Average lumber prices rose about 600 percent between April 2020 and May 2021. (familyhandyman.com)
- The U.S. Bureau of Labor Statistics (BLS) estimates that the number of jobs for woodworkers will decline by 4% between 2019 and 2029. (indeed.com)
- If your lumber isn't as dry as you would like when you purchase it (over 22% in Glen Huey's opinion…probably over 10-15% in my opinion), then it's a good idea to let it acclimate to your workshop for a couple of weeks. (woodandshop.com)
External Links
How To
Tips on how to drive a nail in wood
To drive a nail into wood, the first step is to select the right size and type hammer. Claw hammers include mallets, claw hammers (sledgehammers), mallets, ball-peen hammers, hatchets, and mallets. Each type has its strengths and weaknesses. A claw hammer works well when you're trying to hit nails with a heavy hammer. However it is difficult to precisely control where the blow hits. A sledgehammer is great for hitting large areas at once, but it's too heavy to use effectively for smaller tasks.
After choosing the right hammer, place your hand flat against the side of the head so that the handle rests comfortably in your palm. Hold the handle in your hand, but don’t force it too hard that you break. The hammer should be held straight up with your wrist relaxed. Then swing the hammer back toward the ground, aiming for the center of the nail. You should feel the impact on the nail from the hammer. You can practice swinging the hammer with a block or wood until you feel the rhythm.
When you're ready to start driving the nail, hold the hammer in front of you close to your body. To ensure that the nail is perpendicular on the surface of the wooden floor, position it. Your eyes should be focused on the nail's tip. Then, swing the hammer forward. Next, follow the motion of your hammerhead. You can repeat this several times, increasing your swing speed. Once you've mastered the technique, try adding power to your swings. You can hold the hammer over your shoulder and forcefully bring it down. You will be able to use more energy and put your best foot forward.
Once you have successfully drilled the first hole in the nail, remove the hammer. To pull out the remaining nails, use a screwdriver or pry bar. Keep the nails heads in line with the surface of the board to prevent splitting the wood.