If you've always wanted to carve your own eyes, there's no better way to get started than by following along with a photo trail. It can be a great way to emulate a famous carving without spending hours researching different styles. After all, you want your eyes to be as realistic as possible, and you'll likely have a lot of fun doing it. Don't worry if you haven't been a skilled carver before. There are many easy ways to achieve realistic-looking eyes!
Lesson 4 Carving hair
This tutorial will teach you how to create beautiful flowing hair for your animal carving. It will allow you to create a lifelike appearance and create an illusion of emotion. It will also demonstrate the different tools you can use to make the different textures of hair. To create different levels of hair, you can also learn how to use curved tools. Once you have the basic techniques down, you can move onto more complicated parts of the face, such as the eyeballs and nose.
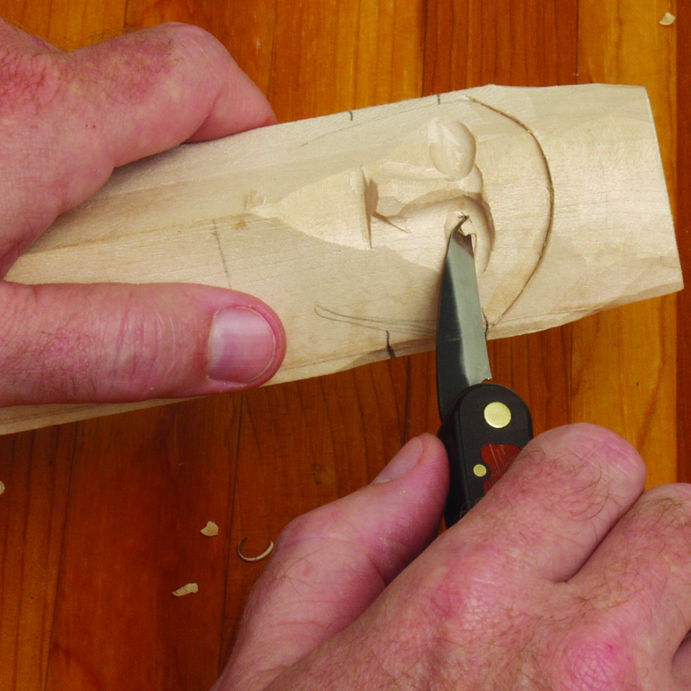
With a pencil, draw the eye cavities. Next, draw straight lines that extend from the eyebrows to the eyelids. You can also make the forehead taller and more rounder by using a pencil. After that, you can use a whittling blade to round out the corners and the bottom lip.
Lesson 5: Carving crow's feet
Crow's feet are something you need to know if you have them. Repeated facial expressions (such as squinting) can lead to these wrinkles. Crow's feet is a result of repeated facial expressions such as squinting. If this is you, then you need to wear reading glasses. For crow’s feet prevention, you can use facial moisturizers.
Fine lines and wrinkles on the face make people appear older than their years. You can easily reduce these lines to give your complexion a younger look. These are some helpful tips.
Lesson 6 - Carving an Iris
Children can see the iris, ocellus and other parts of their bodies in a mirror. This will help them to understand how they feel and look. They can draw their eyes themselves using observational drawing and the mirror. They can also look for white and different shades in the central black. After they have finished the drawing, they can add colour using different media and try to create the illusion of depth. Children can compare their eye drawings and see how they differ in color.
FAQ
Is it necessary to be a genius in woodworking to succeed?
No. It is not rocket science to woodwork. To create stunning works of art, anyone can learn to use basic power tools.
What tools are best to begin with when I become a woodworker
Woodworking requires patience and practice. It takes time to learn how to use all the different tools and techniques required for woodworking.
There are many types of woodworking equipment on the market today. Some prefer to use power tools and others prefer hand tools.
You have the freedom to choose what tool you want, but it is important that you select the right tool for your job. It may be a good idea to start with a basic set, if possible, if you don’t know much about hand tools.
You might also want to learn how a router works, which allows you to cut wood into intricate shapes. These routers can be purchased at most hardware and home improvement stores.
This is a job that I can make a living from.
Yes! Many woodworkers are already doing so. According to the U.S. Bureau of Labor Statistics, the median annual woodworker wage was $34,000 in May 2012. This is significantly higher than the national average, which is $31,000 per year.
What is the difference in plywood and particleboard?
Plywood can be described as a mixture of layers and wood that have been pressed together with pressure. Plywood can be cut to different thicknesses. It's commonly used as flooring and cabinets. Particle board consists of sawdust mixed and resin. The resin is then compressed into large blocks. It's used for home improvement projects. Both types of boards are durable and easy to cut.
Statistics
- The U.S. Bureau of Labor Statistics (BLS) estimates that the number of jobs for woodworkers will decline by 4% between 2019 and 2029. (indeed.com)
- Most woodworkers agree that lumber moisture needs to be under 10% for building furniture. (woodandshop.com)
- In 2014, there were just over 237,000 jobs for all woodworkers, with other wood product manufacturing employing 23 percent; wood kitchen cabinets and countertop manufacturing employing 21 percent. (theartcareerproject.com)
- Average lumber prices rose about 600 percent between April 2020 and May 2021. (familyhandyman.com)
External Links
How To
How to make wood joints
This tutorial will show how to join 2 pieces of wood together. The "pocket hole joint" is a method whereby we drill holes into the wood and glue them together. If your wood has a straight grain, smooth surface, you can use this method. Try dowel joinery instead if your wood doesn't look straight. These are the steps
-
Drill Pocket Hole Joints. Measure and mark the location where you would like to place the pocket hole joint. Use a jigsaw or handheld drilling machine to drill 3/8 inch deep holes at the ends of each wood piece.
-
Sand Smooth. You can sand the edges of the wood to ensure that it doesn't split.
-
Glue Together. Apply glue on both sides of the wooden plank. Let the wood sit for 5 minutes, then clamp it together.
-
Attach the Pieces together. After the glue has dried thoroughly, secure the pieces so that they are flush.
-
Trim Joinery. Trim the excess wood around the joint after the glue has dried completely.
Be sure to leave enough space between each piece so that they can be turned inside-out.