The patent-pending negative rake carbide cutters are a gamechanger in the woodworking field. These cutters make it possible to turn hard woods and manmade materials easily and faster by making smoother cuts. You will also spend less time polishing the final project if you have smooth cuts. Negative-rake cutters are safer than traditional carbide ones and are much easier to use.
Cutting forces can be decreased by using positive rake carbide chopper
Carbide cutters featuring positive rake angles have higher cutting force and a lower chip burden. These types of cutters also have greater chip-reduction capability, as a positive rake cutting edge has a thicker wedge than its counterpart. However, the chip reduction ability of positiverake carbide cutters is only a qualitative indicator. It depends on other factors including the wedge's strength and thickness. A positive rake's thinner wedge is more susceptible to breaking under high chip loads and machine vibrations. Impact loading can cause the wedge to break down, which can lead to poor productivity.
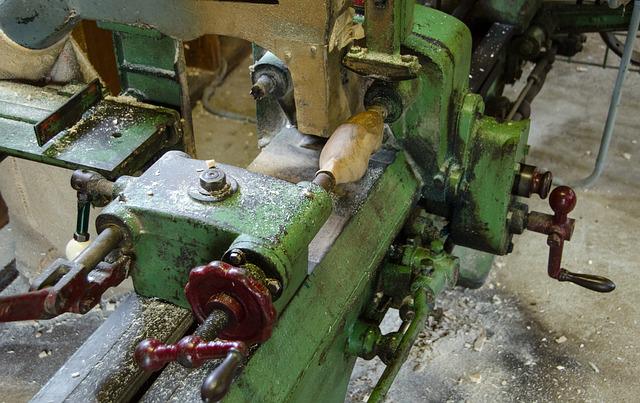
The relative orientation between the cutting face and the work is known as the rake angle. There are two types: negative rake or positive rake. Positive rake refers a rake that is less than 90°. The negative rake carbide cutter is characterized by a blunter cutting edge and a less sharp rake. Both negative rake cutters and positive ones have their advantages and disadvantages.
Cutters made with negative rake carbide yield better results
Negative rake carbide cutters are a great choice if you want to achieve a safe and smooth cut. These tools will help you to turn hard woods and other manmade materials. These tools will cut down on chipping and catching, and make your job much simpler. These cutters also last a long while. The average Negative Rake Carbide Cutter will last for about 80 hours of constant turning.
Easy Wood Tools invented the negative rake carbide cutter. This type of cutter produces better cuts in hard woods and acrylics while also offering a longer edge life. These cutters also come with a replacement 4-40 countersunk machine screw. This carbide cutter comes with the ideal three G's for Carbide. They are an excellent investment for woodworking projects.
TiN carbide cutters reduce cutting forces
TiN carbide cutters produce less cutting force than conventional tools. However, cutting speeds are not directly related to the cutting force generated by TiN carbide cutters. The process parameters such as cutting speed and signal-to-noise (SNR), have a greater impact on the cutting force. A model was developed to calculate this signal-to-noise ratio. This model helps to estimate the impact of cutting parameters on the forces.
Researchers compared the cutting forces of two types of coated carbide tools. One was uncoated and the other had Titanium Nitride (TiN). The researchers measured the wear on flanks and craters using optical microscopy, machine vision systems, as well as using dynamometers to monitor cutting forces. The TiAlN-coated carbide tool showed the best response to cutting forces.
The results of the experiment show that the temperature of TiN-coated tungsten carbide cutters changes with various cutting parameters. Line I's temperature increases slowly at 280360 m/min while Line J and Line K heat up rapidly at 320440/min. This improvement in feed per tooth was responsible for the increase in cutting temperature in the TiAlN-coated tools.
Authentic Easy Wood Tool negative-rake carbide cutters
One of the top choices for quality cutters is the Authentic Simple Wood Tools Negative Rake Carbide Cutter. These tools are made in the USA and can be used with the Easy Wood Tools Mini, Pro Size Roughers, and Micro Detailers. Negative rake carbide cutters provide a smoother finish with fewer "grabs" and are made with the best grade of carbide to ensure maximum performance and durability.
Easy Wood Tools' carbide cutters reduce chipping, catches and other problems when working with man-made material. They are extremely smooth and reduce chipping. The carbide cutting edge is held directly below the workpiece. This transfers the pressure down to the wood. Easy Wood Tools negative rake carbide cutters are ideal for woodturning projects.
FAQ
Where can I start woodworking?
Learning how to build furniture is the best method. While you will need tools and make mistakes, you will eventually master the art of building furniture.
Start by choosing a project you'd like to complete. It can be as simple as a small box, or as complex as a complete entertainment center. Once you have chosen a project, locate a local woodworker who is skilled in this kind of work. Ask them for suggestions on the tools you will need and where to buy them. Maybe you can ask the person if they know of anyone who does this sort of work.
How do I determine what kind of wood my project is made from?
Always verify the label on wood purchases. The label should contain information about the wood species, its moisture content, and whether it has been treated with preservatives.
What woods can be used to make furniture?
Woods are classified by their hardness. Softwoods include pine, fir, cedar, and cypress. Because they are resistant, they can be used for outdoor furniture. Hardwoods include oak, maple, mahogany, and teak. They can't withstand the elements outside so they're best kept indoors.
Statistics
- Most woodworkers agree that lumber moisture needs to be under 10% for building furniture. (woodandshop.com)
- The U.S. Bureau of Labor Statistics (BLS) estimates that the number of jobs for woodworkers will decline by 4% between 2019 and 2029. (indeed.com)
- The best-paid 10 percent make $76,000, while the lowest-paid 10 percent make $34,000. (zippia.com)
- If your lumber isn't as dry as you would like when you purchase it (over 22% in Glen Huey's opinion…probably over 10-15% in my opinion), then it's a good idea to let it acclimate to your workshop for a couple of weeks. (woodandshop.com)
External Links
How To
How to stain wood
Staining wood is the process of applying chemicals to the wood's exterior, which alters its color. This chemical reaction causes the wood color to change from white and brownish red. Oak is the most common wood type for staining. However, you can also use other wood types.
You can apply wood stains in many different ways. Some methods include mixing the stain along with a solvent like turpentine and then applying the mixture to the wood by brushing or spraying. Other methods use a solution of water and dye applied directly to the wood. You can mix stains into varnishes or paints to make them part of your finish coat.
Preparing the surface for staining wood is the first step. Clean the wood to get rid of any grease, dirt or other substances that might be detrimental to the stain's application. Sanding smoothens any scratches or rough spots. Next, you need to decide which stain you want. There are two main types of stain: non-penetrating and penetrating. Penetrating stain penetrates deeper into wood than nonpenetrating, making them suitable for dark colors like mahogany. Penetrating stains are best paired with lighter colors, such as maple.
After you've decided what type of stain to apply, get ready for your tools. You can use a paintbrush to apply stains. This allows you spread the liquid evenly over the surface. It is a good idea to have rags on hand in case you need them to clean up any stains that may remain after you have finished painting. If you intend to mix the stain yourself you will need enough containers to hold all the components.
Once you have prepared your materials, start by cleaning the area where you plan to stain the wood. Use warm water and soap to clean away dirt and dust. Wipe down all furniture pieces with a dampened cloth and clean water. Take care to remove all debris and dirt, especially if you are planning on staining darker wood.
Next, apply the stain. The stain can be applied by spraying or brushing the stain onto one end of the furniture. Slowly and carefully move along the grain of wood, slowly but steadily, until you reach the other end. Make sure that the stain does not drip off the edge of the wood. Before you proceed with the next steps, let the stain dry completely.
To protect the painted surface, apply a coat of clear polyurethane sealant. Apply three coats of polyurethane sealer. Allow the third coat, which should dry overnight, to dry before sanding.